• Services
    • Technical Services
    • Cloud & Data Centers
    • Internet Access
    • Internet Security
  • Cities
    • City of Industry
    • City of Commerce
    • Los Angeles
    • Santa Fe Springs
  • Promotions
  • Customer portal
  • Global IT Home
  • Services
    • Technical Services
    • Cloud & Data Centers
    • Internet Access
    • Internet Security
  • Cities
    • City of Industry
    • City of Commerce
    • Los Angeles
    • Santa Fe Springs
  • Promotions
  • Customer portal
  • Global IT Home
info.globalit.com / Case Studies / How to Create Exchange Email Forward

How to Create Exchange Email Forward

06/21/2016Tony RareNo CommentsCase Studies

How to Create Exchange Email Forward

Note: Before you begin please ensure you are not using Google Chrome. Chrome is not compatible with this feature.
1. Click on the “Settings icon”
a. Click’ options

2. Go to “Organize email”
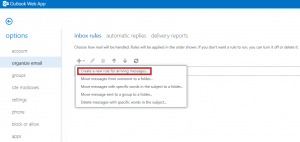
a. Click’ on plus sign

01


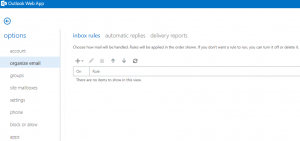
b. Select “create new rule for arriving messages…”

02


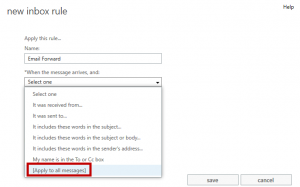
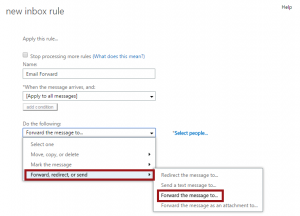
3.Create a name for your forward i.e. (Email Forward)

a. Click drop down menu under “when the messages arrives” Select “Apply to all messages”

03


4. Then click “More Options”

05


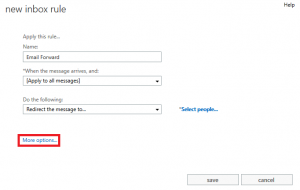
5. Click on drop down “do the following” the click “Forward, redirect, or send” than select “Forward message to”

06


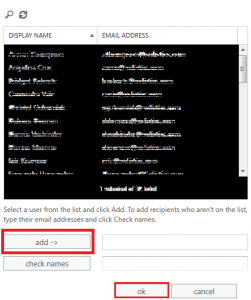
6. Then you will need to select the person you would like to forward your emails to. Click “add” then click “ok”

07


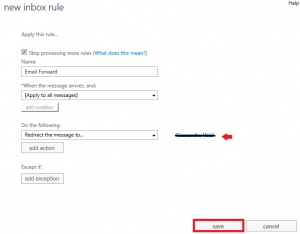
7. The name of the recipient will appear next to the red arrow, ensure it is correct then click “save”

08


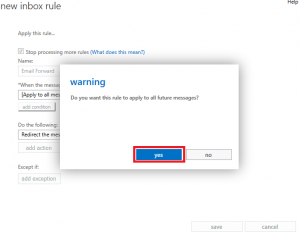
8. When you receive this the following warning click “yes”

09


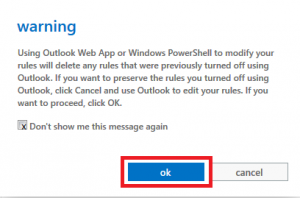
9. You will also receive this pop up message. Check the box and click “ok”

10


Once you have completed these steps the forward should take effect instantly. I would suggest testing the forward to ensure it was set up correctly. If you would like to disable the forward you will need to uncheck the box next to the forward as shown below.

disable forward

Leave a reply

Cancel reply

Your email address will not be published. Required fields are marked *

Prev Post
Next Post
Facebook X-twitter Yelp Instagram Linkedin
  • Technical Services
  • Cloud & Data Centers
  • Internet Access
  • Internet Security
  • Global IT Home
  • Technical Services
  • Cloud & Data Centers
  • Internet Access
  • Internet Security
  • Global IT Home

© 2025 Global IT™ All Rights Reserved with Trademark

  • Visit Us – 5150 Wilshire Blvd, Suite 400. Los Angeles, CA 90036
  • Acceptable Use Policy
  • Privacy Policy